My front-end web developer Brandon Franks and I recently won the ‘The Most Fascinating Data Science Problem Solved’ award in a recent 30 team, 30 hour Hackathon. Our winning submission was a Web app that scraped job listings from Indeed.com, processed them using Natural Language Processing (NLP) and provided a summary of the total number of jobs, the average salary range and the top 10 technical skills for four broad tech positions in the top 20 tech cities in the U.S.
The four broad tech positions – Data Scientist, Web Developer, UX Designer and iOS Developer – include all positions related to that job title. So, a Web Developer includes Web Developer, Front End Engineer, PHP Developer and many other titles deemed by Indeed.com to be Web Developer-related positions.
The top 20 tech cities were determined by calculating the top 20 metro areas(MSAs) in the U.S. based on the highest average mean wage for computer and mathematical occupations. The Indeed.com search takes a 25 mile radius from the city, so the results include surrounding areas of the cities.
First, let’s take a look at the finished product:
While the Web app is very simple to use, it required significant data science behind the scenes to construct the summary results. Let’s step through the process of Web scraping, NLP and app construction needed to bring the site to life in the 30 hour time limit of the Hackathon.
A Word About the Code
All the code, data and associated files for the project can be accessed at my GitHub. The README file provides details of the repo directory and files. The Web scraping and NLP used Jupyter Notebook.
Web Scraping
The Web scraping code uses BeautifulSoup to locate and scrape the data from the Indeed.com site. Always check the robots.txt file before scraping to ensure the data you are scraping is allowed. The initial data we are scraping:
- Job Title
- Company
- Location
- Salary
- Job Description
- Job Count
Let’s take a snippet of code to demonstrate the basic process.
def extract_job_title(soup):
    jobs = []
    for div in soup.find_all(name="div", attrs={"class":"row"}):
        for a in div.find_all(name="a", attrs={"data-tn-element":"jobTitle"}):
            jobs.append(a["title"])
    return(jobs)

city_url = "https://www.indeed.com/jobs?q=" + title_name + \
           "&l=" + city_name + "%2C+" + st_name + \
           "&start=" + str(start)
page = requests.get(city_url)
soup = BeautifulSoup(page.text, "html.parser")

job_title_list.extend(extract_job_title(soup))
In the above code city_url is constructed using the job title, city and state. The html page is then retrieved and stored in the page variable. BeautifulSoup then parses the page into its html components and stores them in the Beautiful soup object soup (a nested data structure).
The extract_job_title function is then called passing it the soup object. The soup.find_all method locates the approriate html and navigates to unique html components associated with that value. In this case the Job Title is found as the subcomponent <a data-tn-element=”jobTitle”> in <div class=”row”>. Your browser inspector becomes an essential tool when Web scraping!
The scraping is time consuming. It takes about 3 hours to scrape about 100 jobs for each of the 80 permutations of 4 job titles and 20 cities. For this reason, the Web app is not live and needs the data to be preprocessed and stored in some form. The resulting dataframe created from the scraping is therefore downloaded to both a .csv file and a sqlite DB table. The .csv file was ultimately used in the app for it’s ease of use and speed.
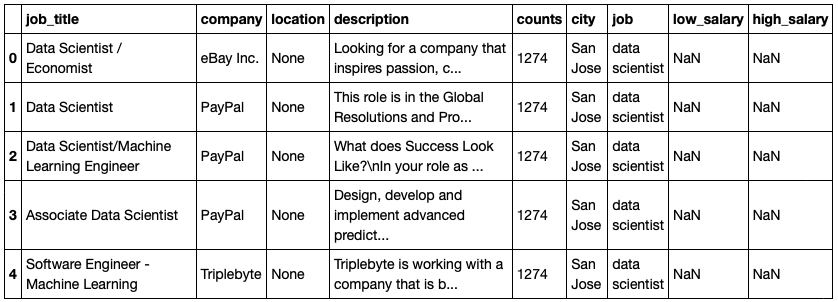
Similar functions were created for each of the data elements and saved to the raw data dataframe below:
The full code for the scraper, scraper.ipynb, can be found here.
Natural Language Processing (NLP)
We now have the raw data from the Web scraping, but we still need to determine the top tech terms for each broad job title. The job description is a huge chunk of text so Natural Language Processing is an ideal approach for extracting the key tech terms from each job description. The general steps are as follows:
- Tokenize - Take the raw text and reduce it to a list of lowercase words free of non-alphanumeric characters (tokens).
- Remove the Stop Words - Get rid of commonly used words that we can ignore (e.g. “I”, “and”, “the”, etc.).
- Lemmatize - Transform the tokens into their base form called a lemma (e.g. runs, running and ran are all forms of the lemma run).
- Reduce - Run the base tokens through a tech terms dictionary of around 100 tech terms to reduce the number of base tokens.
- Count and Rank - Count the base tech tokens, rank them and store them as a list in a dataframe.
Tokenize, Remove Stop Words and Lemmatize
The tokenize process requires two steps. A preprocessing step to clean the text and the actual tokenization step.
The text cleaning in the following code snippet uses a combination of methods including BeautifulSoup, replace, regex, sub and lower to transform the text into alphanumeric words in lower case.
# Clean the text
def clean_text(text):
    text = text.replace('\n', ' ')                # remove newline
    text = BeautifulSoup(text, "lxml").get_text() # remove html
    text = text.replace('/', ' ')                 # remove forward slashes
    text = re.sub(r'[^a-zA-Z ^0-9]', '', text)    # letters and numbers only
    text = text.lower()                           # lower case
    text = re.sub(r'(x.[0-9])', '', text)         # remove special characters
    return text

df['description'] = df.apply(lambda x: clean_text(x['description']), axis=1)
The text is then tokenized using the spacy tokenizer. Spacy is free, open-source library for advanced NLP. In the following code snippet the spacy Tokenizer is initialized with the English language model (large) and any additional stop words are added. In this case, only ‘year’ was added to stop words as we will be eliminating many other words later in the code.
After initialization, a tokenizer.pipe is used to read in the text from the description column into doc. For each doc, the token.lemma_ is appended to a list. This results in a list of lemmas for each row of the dataframe. The final list in then added as a column named tokens.
# Initialize the tokenizer
nlp = spacy.load("en_core_web_lg")
tokenizer = Tokenizer(nlp.vocab)
STOP_WORDS = nlp.Defaults.stop_words.union(['year'])

# Tokenizer pipe removing stop words and blank words and lemmatizing
tokens = []

for doc in tokenizer.pipe(df['description'], batch_size=500):

    doc_tokens = []
    for token in doc:
        if (token.lemma_ not in STOP_WORDS) & (token.text != ' '):
            doc_tokens.append(token.lemma_)

    tokens.append(doc_tokens)

df['tokens'] = tokens
Reduce Tokens to Key Tech Terms
In order to filter out as much “noise” as possible, a list of about 100 tech terms was created and the tokens filtered through the list. This results in a list of tech term tokens for each job listing.
# Tech terms list
tech_terms = ['python', 'r', 'sql', 'hadoop', 'spark', 'java', 'sas', 'tableau',
              'hive', 'scala', 'aws', 'c', 'c++', 'matlab', 'tensorflow', 'excel',
              'nosql', 'linux', 'azure', 'scikit', 'machine learning', 'statistic',
              'analysis', 'computer science', 'visual', 'ai', 'deep learning',
              'nlp', 'natural language processing', 'neural network', 'mathematic',
              'database', 'oop', 'blockchain',
              'html', 'css', 'javascript', 'jquery', 'git', 'photoshop', 'illustrator',
              'word press', 'seo', 'responsive design', 'php', 'mobile', 'design', 'react',
              'security', 'ruby', 'fireworks', 'json', 'node', 'express', 'redux', 'ajax',
              'java', 'api', 'state management',
              'wireframe', 'ui prototype', 'ux writing', 'interactive design',
              'metric', 'analytic', 'ux research', 'empathy', 'collaborate', 'mockup',
              'prototype', 'test', 'ideate', 'usability', 'high-fidelity design',
              'framework',
              'swift', 'xcode', 'spatial reasoning', 'human interface', 'core data',
              'grand central', 'network', 'objective-c', 'foundation', 'uikit',
              'cocoatouch', 'spritekit', 'scenekit', 'opengl', 'metal', 'api', 'iot',
              'karma']

df['tokens_filtered'] = df.apply(lambda x: list(set(x['tokens']) & set(tech_terms)), axis=1)
Count and Rank
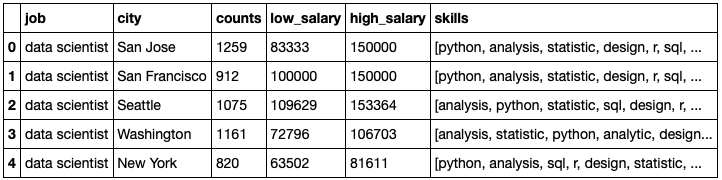
For each job title and city the tech term tokens are then counted and ranked. The top ten terms are then placed in ranked order in a list in the dataframe. The final dataframe summarized by job title and city final_df is below:
This dataframe is downloaded to a .csv file and provides the data we will use in the Web application.
The full code for the NLP, nlp.ipynb, can be found here.
The Flask App
Flask is a simple Python Web development framework that is ideal for small projects such as this. The specifics of using Flask will not be covered in this article, however an overview of the code will be provided.
The basic layout of the code is as follows:
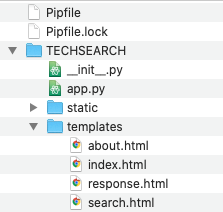
The Pipfiles provide the environment and dependencies for the application. The __init__.py file holds the initialization code, the static directory contains static content such as images, css, and javascript, and the templates directory contain the html files. The main code for the flask app is contained in app.py as follows:
# Import Flask package

from flask import Flask, request, render_template
import pandas as pd
import re
import string


def create_app():
    # Create Flask web server, makes the application
    app = Flask(__name__)

    # Routes determine location
    @app.route("/")
    def home():
        return render_template('index.html')

    @app.route("/search", methods=['GET'])
    def input():
        return render_template('search.html')

    @app.route("/output", methods=['POST'])
    def output():
        df = pd.read_csv('https://raw.githubusercontent.com/JimKing100/techsearch/master/data/scrape_results1.csv')
        df = df.drop(df.columns[0], axis=1)

        title = request.values['title']
        city = request.values['city']
        result_df = df.loc[(df['job'] == title) & (df['city'] == city)]
        r_title = result_df['job'].iloc[0]
        r_city = result_df['city'].iloc[0]
        r_count = result_df['counts'].iloc[0]
        r_lsalary = result_df['low_salary'].iloc[0]
        r_hsalary = result_df['high_salary'].iloc[0]

        r_skills = re.sub('['+string.punctuation+']', '', result_df['skills'].iloc[0]).split()

        return render_template('response.html',
                               title='Search Results',
                               r_title=r_title,
                               r_city=r_city,
                               r_count=r_count,
                               r_lsalary=r_lsalary,
                               r_hsalary=r_hsalary,
                               r_skills=r_skills
                               )

    @app.route("/about")
    def about():
        return render_template('about.html')

    return app
Flask uses routes to assign URLs to functions. So the ‘/’ route renders the index or home page, the ‘/about’ route renders the about page and so on. When a user selects a job title and city from the drop-down lists on the search page and hits the search button the ‘/output’ route is called on the POST method and the actual search is performed and a results page rendered.
The Python code is fairly straightforward. The dataframe containing the final results of the scraping and NLP is loaded, the values for job title and city are requested, a subset of the data based on job title and city is extracted and the results are passed to the page renderer.
This summarizes the entire process for creating a winning Hackathon project!
Tech Job Data Source: Indeed.com